Insider risk management: The Silent Threat

Why Insider Risk Management is Critical for Businesses in 2024

In March of 2019, a large auto manufacturer with state-of-the-art, proprietary operations and technology filed a lawsuit against four former employees and a competitor for corporate espionage. The lawsuit was filed after discovering that the employees had downloaded proprietary warehouse schematics and operational procedures before leaving the company and shared them with the competitor.

Trusting employees is key to fostering a dynamic and productive workplace. But with trust also comes risk. Companies need to be able to quickly identify and manage risk from insiders (employees or contractors with corporate access) to minimize the negative impact to their business. Insider threats and risks from illegal, inappropriate, unauthorized, or unethical behavior and actions are a major issue for all companies and can easily go undetected until it is too late. A survey by Crowd Research Partners in 2018 indicated that 90% of organizations feel vulnerable to insider risks and 53% confirmed insider risks against their organization in the previous 12 months. According to a Carnegie Mellon CERT study, 92% of insider threat cases were preceded by a negative work event, such as a termination, demotion, or dispute with a supervisor. And in 2016, Deloitte reported that 59% of employees who leave an organization voluntarily or involuntarily say they take sensitive data with them and that 51% of employees involved in an insider threat incident had a history of violating IT security policies leading up to the incident.

Data breaches are a constant worry for businesses of all sizes. We hear about hackers and cyberattacks all the time, but there’s another, often-overlooked threat lurking inside your organization: insider threats.

The Scope of the Insider Threat Problem

Here are some eye-opening statistics to highlight the seriousness of insider threats:

  • Ponemon Institute’s 2023 Cost of a Data Breach Report: Insider threats were the cause of 24% of data breaches in 2023, resulting in an average cost per breach of $5.07 million (https://www.ponemon.org/)
  • IBM X-Force Insider Threat Report 2022: 85% of organizations reported experiencing at least one insider threat incident in the past year. (https://www.ibm.com/downloads/cas/ADLMYLAZ)
  • Verizon 2023 Data Breach Investigations Report: Privileged misuse (when an insider uses their authorized access for malicious purposes) was the most common insider threat tactic, accounting for 80% of insider breaches. (https://www.verizon.com/business/resources/reports/dbir/)

These statistics paint a clear picture: insider threats are a significant risk, and they’re becoming more common. So, what can businesses do to protect themselves?Insider risk management is a proactive approach that goes beyond simply identifying suspicious individuals. It focuses on:

  • Data Security: Protecting sensitive data is paramount. Insider risk management involves monitoring user activity and data access patterns to detect risky behaviors before they escalate into a breach.
  • Understanding Intent: Unlike traditional methods that focus solely on malicious intent, insider risk management acknowledges that even unintentional mistakes by employees can lead to data breaches. It implements controls and training to address both scenarios.
  • Proactive Approach: Early detection is key. Insider risk management utilizes data analytics and user behavior monitoring to identify potential risks before they escalate into major incidents.

Building a Robust Insider Risk Management Program

Here are some key steps to take:

  • Data Classification: Classify your data based on its sensitivity. This helps prioritize risks and implement appropriate security controls.
  • User Access Controls: Implement the principle of least privilege, granting users only the access level they need to perform their jobs.
  • Data Activity Monitoring: Monitor user activity related to sensitive data access and flag suspicious patterns for investigation.
  • Security Awareness Training: Educate employees on data security best practices and how to identify and report suspicious activity.
  • Incident Response Plan: Develop a plan for responding to insider threat incidents quickly and effectively.

Microsoft Purview: A Multifaceted Approach to Insider Risk

Microsoft Purview goes beyond basic security by providing functionalities specifically designed to address insider threats. Here’s how it helps:

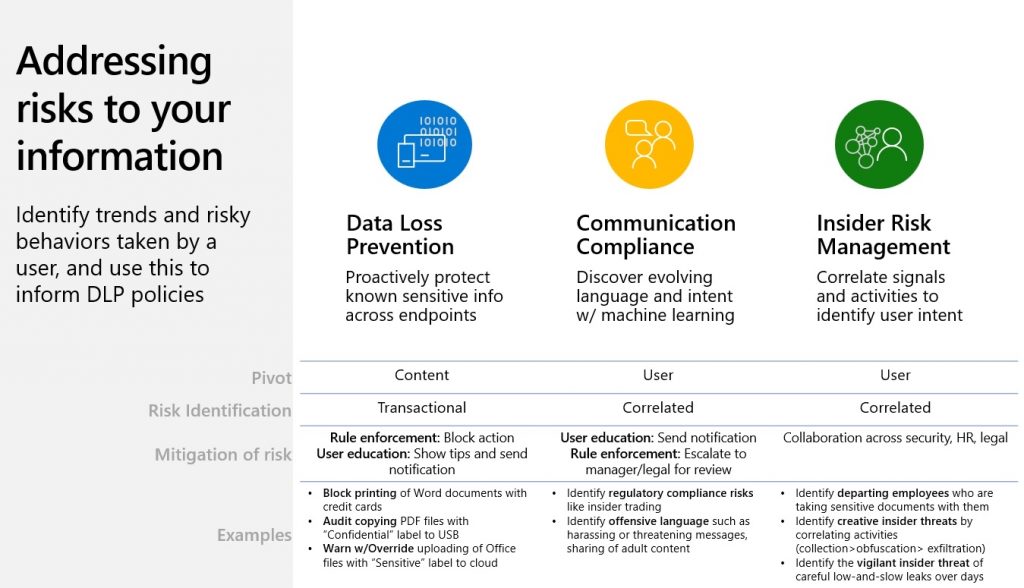
  • Data Loss Prevention (DLP): Purview DLP helps you identify, classify, and protect sensitive data across your organization’s Microsoft 365 environment. By setting DLP policies, you can prevent unauthorized data exfiltration attempts, whether intentional or accidental.
  • Insider Risk Management: This dedicated Purview solution leverages machine learning and user behavior analytics to identify potential insider risks. It analyzes various signals, including data access patterns, email activity, and downloaded files, to detect anomalies that might indicate malicious intent or risky behavior.
  • User Activity Monitoring: Gain granular visibility into user activities across Microsoft 365 applications. Purview allows you to monitor user access attempts, downloads, and file modifications, enabling you to identify suspicious activities and investigate potential insider threats.
  • Advanced Analytics: Purview provides powerful analytics capabilities that help you correlate data from various sources to build a comprehensive picture of user behavior and identify potential risks. This proactive approach allows you to intervene before a security breach occurs.

Benefits of Using Microsoft Purview for Insider Risk Management:

  • Reduced Risk of Data Breaches: By proactively identifying and addressing potential insider threats, Purview helps minimize the risk of data breaches and protects your sensitive information.
  • Improved Security Posture: Purview strengthens your organization’s overall security posture by providing a multi-layered approach to insider risk mitigation.
  • Enhanced Compliance: Purview helps you comply with data privacy regulations by ensuring the secure handling of sensitive information.
  • Simplified Investigations: Purview facilitates efficient investigations by providing centralized access to user activity data and insights into potential insider threats.

Taking Action Against Insider Threats

Microsoft Purview empowers organizations to move beyond reactive security measures and implement a proactive insider risk management strategy. By leveraging its comprehensive set of tools and functionalities, you can gain valuable insights into user behavior, identify potential risks, and take timely action to safeguard your sensitive data.

By implementing a comprehensive insider risk management program, organizations can significantly reduce their risk of data breaches caused by insiders. This proactive approach can save businesses millions of dollars, protect their reputation, and ensure the security of their sensitive data.

Remember, insider risk management is an ongoing process. Regularly review and update your program to stay ahead of evolving threats.

The Art of Formatting in PowerShell: Presenting Data with Clarity

PowerShell offers a rich set of tools for formatting your command output, transforming raw data into clear and concise presentations. This blog post will delve into the essential formatting techniques, empowering you to display information in a user-friendly and informative way.

1. Select-Object Cmdlet: Choosing the Right Properties

The Select-Object cmdlet plays a crucial role in formatting. It allows you to specify which properties of an object you want to display, controlling the data included in the output.

PowerShell

Get-Process | Select-Object Name, CPU  # Display only process name and CPU usage
Get-Service | Select-Object -ExpandProperty Name  # Display only service names in a list

The first example retrieves process information but selects only the “Name” and “CPU” properties for display. The second example selects only the “Name” property of each service and expands it into a list, displaying just the service names.

2. Format-Table Cmdlet: Tabular Presentation for Readability

The Format-Table cmdlet presents objects in a tabular format, making it easier to read and compare multiple objects with similar properties.

PowerShell

Get-Process | Format-Table Name, CPU, Status  # Display processes in a table with headers
Get-Service | Where-Object {$_.Status -eq "Stopped"} | Format-Table Name, DisplayName  # Filter and format stopped services

The first example displays process information in a table with headers for “Name,” “CPU,” and “Status.” The second example filters for stopped services and then formats them in a table showing “Name” and “DisplayName” for clarity.

3. Format-List Cmdlet: Detailed View of Object Properties

The Format-List cmdlet displays all properties of an object in a list format. This is helpful for exploring the complete set of properties available for an object.

PowerShell

Get-Process -Name notepad | Format-List  # Display detailed information for the "notepad" process
Get-Service | Where-Object {$_.Name -like "*sql*"} | Format-List  # Get details of services with "sql" in their name

The first example retrieves information about the “notepad” process and displays all its properties in a list format. The second example filters for services containing “sql” in their names and then displays a detailed list of their properties.

4. Out-GridView Cmdlet: Interactive Grid View for Data Exploration

The Out-GridView cmdlet presents the output in an interactive grid view. This allows you to sort, resize columns, and filter data within the window itself.

PowerShell

Get-Process | Out-GridView  # Display processes in an interactive grid
Get-Service | Where-Object {$_.Status -eq "Running"} | Out-GridView  # Filter and display running services in a grid

Both examples showcase using Out-GridView to display the output in an interactive grid. You can click headers to sort data, resize columns for better viewing, and filter information within the grid itself.

5. Formatting Options within Cmdlets: Customizing Output

Many cmdlets offer built-in formatting options through parameters like Format or View. These options allow you to customize the appearance of the output further.

PowerShell

Get-Process | Format-List Name, CPU -Wide  # Display process details with wider columns
Get-Service | Select-Object Name, Status | Format-Table -AutoSize  # Adjust table columns to fit content automatically

The first example uses the -Wide parameter with Format-List to display process information with wider columns for better readability. The second example utilizes the -AutoSize parameter with Format-Table to automatically adjust the width of table columns to fit the content displayed.

Mastering Output Redirection in PowerShell: Streamlining Your Workflow

PowerShell’s output redirection capabilities empower you to send command output to different destinations, enhancing your workflow and data management. This blog post will explore the various redirection techniques available, allowing you to control where your commands’ results are directed.

1. Greater Than (>) Operator: Sending Output to a File

The greater than (>) operator redirects the output of a command to a specified file. Any existing content in the file will be overwritten.

PowerShell

Get-Process | Out-File processes.txt  # Redirect process information to a file named "processes.txt"
Get-Service | Where-Object {$_.Status -eq "Stopped"} > stopped_services.txt  # Filter and redirect stopped services to a file

In the first example, the Get-Process command retrieves process information and redirects it to a file named “processes.txt.” The second example filters stopped services and directs their details to a file named “stopped_services.txt.”

2. Greater Than Double-Right Arrow (>>) Operator: Appending Output to a File

The greater than double-right arrow (>>) operator appends the output of a command to an existing file.

PowerShell

Get-Service | Out-File service_log.txt  # Write initial service list to a file
Get-Service | Where-Object {$_.Status -eq "Running"} >> service_log.txt  # Append running services to the same file

Here, the first command writes a list of all services to a file named “service_log.txt.” The second command retrieves running services and appends their details to the same file, maintaining a historical log.

3. Out-Host Cmdlet: Displaying Output in the Console

The Out-Host cmdlet explicitly sends the output of a command to the PowerShell console window. This is useful when you want to ensure the output is displayed even if piped to another command.

PowerShell

Get-Process | Out-Host  # Display process information directly in the console
Get-Service | Where-Object {$_.Name -like "*sql*"} | Out-Host  # Filter and display services with "sql" in their name

Both examples showcase using Out-Host to display the output of commands directly in the console window, even if they are piped to another command.

4. Tee-Object Cmdlet: Duplicating Output to Multiple Destinations

The Tee-Object cmdlet allows you to send the output of a command to both the console and a file simultaneously.

PowerShell

Get-Process | Tee-Object -FilePath process_log.txt | Out-Host  # Write process info to a file and display it in the console

In this example, the Get-Process command’s output is duplicated. It’s written to a file named “process_log.txt” using Tee-Object and simultaneously displayed in the console using Out-Host.

5. Select-Object Cmdlet for Formatting Output before Redirection

The Select-Object cmdlet allows you to format the output before redirecting it. This is helpful for customizing the data written to a file.

PowerShell

Get-Process | Select-Object Name, CPU, Status | Out-File processes.txt  # Select specific properties and redirect to a file

Here, the Get-Process command retrieves process information. Then, Select-Object is used to choose only the “Name,” “CPU,” and “Status” properties before redirecting the formatted output to a file named “processes.txt.”

Mastering Object Manipulation in PowerShell: A Guide to Essential Cmdlets

PowerShell excels at manipulating objects, the heart of most data it works with. This blog post dives into the essential object manipulation cmdlets, empowering you to filter, sort, format, group, and analyze data effectively in your scripts.

1. Select-Object: Picking the Perfect Properties

This cmdlet allows you to choose specific properties you want to display from an object. Here’s how it works:

PowerShell

Get-Process | Select-Object Name, CPU -ExpandProperty Name  # Select Name and CPU properties, then expand Name into a list

This command retrieves process information, selects only the “Name” and “CPU” properties, and then expands the “Name” property into a list of process names.

2. Sort-Object: Arranging Objects in Order

This cmdlet lets you sort objects based on specific properties. Sort order can be ascending or descending.

PowerShell

Get-Service | Sort-Object Status  # Sort services by their Status property
Get-Process | Sort-Object CPU -Descending  # Sort processes by CPU usage (descending order)

The first command sorts services by their “Status” property. The second command sorts processes based on their CPU usage, with the most resource-intensive processes listed first.

3. Measure-Object: Analyzing Object Statistics

This cmdlet calculates statistical information about objects, such as count, average, minimum, and maximum values for specific properties.

PowerShell

Get-Process | Measure-Object -Property CPU -Average  # Calculate average CPU usage for all processes
Get-Service | Measure-Object -Property @{Name="RunningServices"; Expression{$_.Status -eq "Running"}}  # Count running services

The first command calculates the average CPU usage across all processes. The second command uses a calculated property to count only running services.

4. Group-Object: Categorizing Objects by Shared Values

This cmdlet groups objects based on a specific property, allowing you to analyze data by category.

PowerShell

Get-Process | Group-Object Status  # Group processes by their Status property
Get-Service | Group-Object Name -NoElement  # Group services by Name but hide individual service details

The first command groups processes based on their “Status” (Running, Stopped, etc.). The second command groups services by “Name” but hides the details of each service within the group.

5. Where-Object: Filtering Objects Based on Conditions

This cmdlet allows you to filter objects based on specific criteria. You can use comparison operators and wildcards for flexible filtering.

PowerShell

Get-Process | Where-Object {$_.Name -like "*notepad*"}  # Filter processes with "notepad" in their name
Get-Service | Where-Object {$_.Status -eq "Stopped" -and $_.Name -notlike "*sql*"}  # Filter for stopped services except those with "sql" in their name

The first command filters for processes containing “notepad” in their name. The second command filters for stopped services, excluding those with names containing “sql.”

6. ForEach-Object: Processing Objects Individually

This cmdlet allows you to iterate through each object in a collection and perform an action on each one.

PowerShell

Get-Process | ForEach-Object { Write-Host "Process Name: ${\_.Name}, CPU: ${\_.CPU}%"}  # Display details for each process
Get-Service | ForEach-Object { Stop-Service $_.Name -Force  # Stop all running services (use with caution)

The first command iterates through each process and displays its name and CPU usage. The second command (use with caution) iterates through each service and stops it forcefully.

7. New-Object: Constructing Custom Objects

This cmdlet allows you to create new objects with specific properties and values. This can be useful for storing data or building complex data structures.

PowerShell

$computerInfo = New-Object PSObject -Property @{
  "ComputerName" = "Server1"
  "OSVersion" = "Windows 10"
  "Memory" = (Get-WmiObject Win32_OperatingSystem).TotalVisibleMemorySize / 1MB
}
Write-Host $computerInfo  # Display the newly created object with its properties

This code creates a new object named $computerInfo with three properties: “ComputerName,” “OSVersion,” and “Memory.” The “Memory” property retrieves the total visible memory size from the system and converts it to megabytes.

Parenthetical Commands in Powershell

Parentheses in PowerShell: Ensuring Clarity and Order

Parentheses play a crucial role in PowerShell for defining the order of execution and enhancing the clarity of your scripts. This blog post will delve into the various use cases of parentheses in PowerShell, empowering you to write well-structured and efficient commands.

1. Defining Order of Operations: Precedence Matters

PowerShell follows a specific order of operations (precedence) when evaluating expressions. Parentheses allow you to override this default order and ensure your commands execute as intended.

Here’s an example:

PowerShell

2 * 3 + 5  # Evaluates to 11 (multiplication happens first)

(2 * 3) + 5  # Evaluates to 11 (parentheses force multiplication first)

In the first example, multiplication (2 * 3) happens before addition (resulting in 6), and then 6 is added to 5, giving a final answer of 11. In the second example, the parentheses force the multiplication within the parentheses to happen first, resulting in 6, which is then added to 5 for a final answer of 11.

2. Grouping Expressions for Clarity

Parentheses can be used to group expressions within a command, improving readability and clarity, especially when dealing with complex expressions.

For example:

PowerShell

Get-Process | Where-Object {$_.Name -like "*notepad*" -and $_.Status -eq "Running"} 

Here, the parentheses group the filtering conditions, making it clear that we’re searching for processes containing “notepad” in their name AND those processes are also in a “Running” state.

3. Using Sub-Expressions within Calculations

Parentheses allow you to create sub-expressions within calculations, enabling more complex operations.

For example:

PowerShell

$diskSpace = Get-Volume -DriveLetter C | Select-Object -ExpandProperty TotalFreeSpace
Write-Host "Free space on C: drive: ${(diskSpace / 1GB)} GB"

Here, the parentheses around ($diskSpace / 1GB) create a sub-expression that converts the total free space (in bytes) to gigabytes before displaying it.

4. Nesting Parentheses for Complex Logic

PowerShell allows nesting parentheses for intricate logic within your commands. However, it’s essential to maintain proper nesting to avoid confusion.

For example:

PowerShell

Get-Service | Where-Object { 
  ($_.Status -eq "Stopped") -or 
  ($_.Name -like "*sql*") 
}

In this example, the outer parentheses group the entire filtering condition. The inner parentheses group the first condition (service stopped) and the second condition (service name containing “sql”). This logic retrieves all stopped services or services with names containing “sql.”

Best Practices for Using Parentheses

  • Use parentheses liberally to enhance readability, especially in complex expressions.
  • Employ proper nesting to avoid unintended behavior.
  • Consider using comments within your script to explain complex logic involving parentheses.

How Powershell Pipeline works?

The Power of the Pipeline: Data Flow in PowerShell

PowerShell’s pipeline is one of its most powerful features, enabling you to seamlessly chain commands together and automate complex tasks. This blog post will be your guide to understanding the pipeline concept, its core principles, and how to leverage it to streamline your workflow.

An Analogy for Beginners

Imagine a factory assembly line. Raw materials enter at one end, and each station performs a specific task, transforming the material until the finished product emerges at the other end. The PowerShell pipeline works similarly.

  • Commands as Stations: Each command in the pipeline acts as a station on the assembly line.
  • Data as Material: The output of one command becomes the raw material for the next command in the pipeline.

By connecting commands with the pipe symbol (|), you create a data flow that allows you to manipulate information efficiently.

Building Your First Pipeline: A Hands-on Example

Let’s say you want to find all running Chrome processes and stop them. Here’s how you can achieve this using a pipeline:

PowerShell

Get-Process chrome | Stop-Process
  • Get-Process: This command acts as the first station, retrieving information about all running processes.
  • Pipe Symbol (|): This symbol acts as the conveyor belt, sending the output of Get-Process (information about processes) to the next command.
  • Stop-Process: This command acts as the second station, receiving the list of processes from Get-Process and stopping any processes identified as “chrome.”

In essence, the pipeline allows you to filter the processes retrieved by Get-Process and use them as input for Stop-Process.

Leveraging the Pipeline for Complex Tasks

The pipeline’s true power lies in its ability to handle complex data manipulation. Here’s an example:

PowerShell

Get-Service | Where-Object {$_.Status -eq "Stopped"} | Select-Object -ExpandProperty Name
  • Get-Service: This command retrieves information about all system services.
  • Where-Object: This command acts as a filter, selecting only services where the Status property equals “Stopped.”
  • Pipe Symbol (|): The pipe symbol sends the filtered list of stopped services to the next command.
  • Select-Object -ExpandProperty Name: This command selects only the Name property of each stopped service and expands the output into a single list of service names.

This pipeline retrieves all services, filters for stopped ones, and then extracts just the service names, providing a clean list of stopped services on your system.

Benefits of Using the Pipeline

Here are some key advantages of using the PowerShell pipeline:

  • Improved Readability: Pipelines make your scripts more readable by visually depicting the flow of data from one command to the next.
  • Reduced Code Duplication: By filtering and manipulating data within the pipeline, you can avoid repetitive code in your scripts.
  • Enhanced Efficiency: Pipelines streamline data processing, allowing you to achieve complex tasks with fewer commands.

Tips for Mastering the Pipeline

  • Start Simple: Begin with basic pipelines to grasp the core concept before venturing into complex scenarios.
  • Understand Command Outputs: Familiarize yourself with the data format each command produces to ensure compatibility within the pipeline.
  • Embrace Parentheses: Use parentheses around complex expressions within the pipeline for better readability and to avoid unintended behavior.

Decoding Powershell Help System

Power shell help provides detailed information about cmdlets, functions, aliases, and more. Here’s a breakdown of what to expect and how to interpret the key sections:

1. Name: This is the official name of the cmdlet or function you’re looking up.

2. Synopsis: A concise one-liner summarizing the cmdlet’s purpose and basic usage.

3. Syntax: This section shows the various valid ways to structure the command, including required and optional parameters. It often includes square brackets ([]) to indicate optional elements and angle brackets (< >) for placeholders to be replaced with actual values.

For example:

PowerShell

Get-Process [-Name] <processName> [-List]

Here, Get-Process is the cmdlet, -Name and -List are optional parameters, and <processName> is a placeholder for the actual process name you want to retrieve.

4. Description: This section provides a more detailed explanation of what the cmdlet does and how it works. It often includes examples of common usage scenarios.

5. Parameters: This section lists all the parameters associated with the cmdlet, explaining their purpose, data types (e.g., string, number), and whether they’re mandatory or optional.

6. Inputs: This section describes the type of data the cmdlet accepts as input.

7. Outputs: This section details the type of data the cmdlet produces as output. Understanding the output format is crucial for piping the results to other commands.

8. Related Links: This section might provide links to relevant documentation or help topics for further exploration.

9. Remarks: This section includes additional notes, warnings, or best practices related to using the cmdlet.

Tips for Interpreting Help:

  • Focus on the Synopsis and Description: These sections give you a quick understanding of the cmdlet’s functionality.
  • Pay Attention to Syntax: The syntax breakdown is crucial for constructing the command correctly.
  • Explore Parameters: Understanding the parameters and their options allows you to fine-tune the cmdlet’s behavior.
  • Read Examples: The provided examples demonstrate practical usage scenarios and can be a great starting point for your own scripts.

In PowerShell help, brackets (especially square brackets []) play a crucial role in conveying how to structure a command. Here’s a breakdown of their meaning:

1. Optional Parameters:

Square brackets around a parameter name and its data type (e.g., [-Name <String>]) indicate that the parameter is optional. You can use the cmdlet without specifying that parameter, but it might affect the output or functionality.

2. Positional vs. Named Parameters:

PowerShell generally supports both positional and named parameters. Positional parameters rely on the order in which you specify them, while named parameters explicitly use their name followed by a colon and the value.

  • Without Brackets: If a parameter’s name appears without brackets in the syntax, it’s typically a positional parameter. Specifying its position in the command is crucial.

For example:

PowerShell

Get-Process notepad  # "notepad" is interpreted as positional parameter for process name
  • With Brackets: When a parameter name and data type are enclosed in square brackets (e.g., [-Name <String>]), it becomes an optional named parameter. You can use it by name and position, or omit it entirely if not required.

Here’s an example with both positional and named parameters:

PowerShell

Get-Process -Name notepad  # Positional parameter for name
Get-Process chrome -List  # Both named parameters 

3. Multiple Values:

Double square brackets around a parameter’s data type (e.g., [-ComputerName <String[]>]) indicate that the parameter can accept multiple values. You can provide a comma-separated list of values or an array to this parameter.

For example:

PowerShell

Get-Service -ComputerName Server1, Server2  # Comma-separated list
$servers = @("Server1", "Server2")
Get-Service -ComputerName $servers  # Using an array

4. Wildcards:

Square brackets can also be used with wildcards like “*” within parameter values to represent a pattern. This allows for broader filtering based on patterns.

For example:

PowerShell

Get-Process -Name *note*  # Matches processes with "note" anywhere in the name

Finding Powershell commands

How to find Powershell commands

There are a couple of ways to find commands in PowerShell, depending on whether you’re looking for something specific or browsing for possibilities

1. Get-Command:

This cmdlet is your go-to tool for discovering available commands. Here’s how to use it:

  • List All Commands:

PowerShell

Get-Command

This will display a list of all cmdlets, functions, and aliases currently available in your session.

  • Find Commands by Name (including wildcards):

PowerShell

Get-Command Get-*

This will search for commands that start with “Get-“. You can use wildcards like “*” to broaden your search.

  • Filter by Type:

PowerShell

Get-Command -CommandType Cmdlet

This will list only cmdlets (not functions or aliases). You can replace “Cmdlet” with “Alias” or “Function” to filter by those types.

2. Online Resources:

3. Tab Completion:

PowerShell offers tab completion to help you discover commands and parameters as you type. Simply start typing a command name and press the Tab key. PowerShell will suggest possible completions based on what you’ve entered so far.

4. Get-Help:

Once you’ve found a potential command, use Get-Help to learn more about it.

PowerShell

Get-Help Get-Process

This will provide detailed information about the Get-Process cmdlet, including its syntax, parameters, and examples.

Powershell Syntax

A Beginner’s Guide to PowerShell Syntax

PowerShell’s power lies in its intuitive syntax, making automation tasks a breeze. This blog post is designed for beginners, guiding you through the fundamentals of PowerShell syntax and empowering you to write your own scripts.

Building Blocks of a PowerShell Command

A typical PowerShell command consists of three key elements:

  1. Cmdlet: This is the heart of a PowerShell command. Cmdlets are mini-programs that perform specific actions, like retrieving information (Get-Process), managing files (New-Item), or stopping services (Stop-Service).
  2. Parameters: Cmdlets often accept parameters that refine their behavior. These act like fine-tuning knobs, allowing you to specify details like which process to get (Get-Process -Name notepad) or the name of the file to create (New-Item -Path C:\test\myfile.txt).
  3. Arguments: Arguments provide values to the parameters. They follow the parameter name after a hyphen (-).

Here’s an example to illustrate:

PowerShell

Get-Process -Name notepad

In this example, Get-Process is the cmdlet, -Name is the parameter, and notepad is the argument specifying the process name to retrieve.

Mastering the Art of Piping

PowerShell shines with its ability to chain commands together using pipes (|). This lets you take the output of one command and use it as input for another.

For instance, imagine you want to list all running notepad processes and then stop them. You can achieve this with a single line:

PowerShell

Get-Process -Name notepad | Stop-Process

Here, Get-Process retrieves notepad processes, and the pipe (|) sends that information as input to Stop-Process, which terminates them.

Working with Variables

Variables store data for later use in your scripts. To create a variable, use the New-Variable cmdlet or the shorthand assignment operator (=).

For example:

PowerShell

$processName = "notepad"
Get-Process -Name $processName

Here, we create a variable $processName and assign it the value "notepad". Then, we use this variable in the Get-Process cmdlet to retrieve the desired process.

Conditional Statements: Making Decisions

PowerShell allows you to control the flow of your scripts using conditional statements like if, else, and elseif. These statements evaluate conditions and execute specific commands based on the outcome.

Here’s a simplified example:

PowerShell

$process = Get-Process -Name notepad
if ($process) {
  Write-Host "Notepad is running"
} else {
  Write-Host "Notepad is not running"
}

This script checks if a process named notepad exists. If it does, it displays a message indicating it’s running; otherwise, it displays a message stating it’s not running.

Loops: Repetitive Tasks Made Easy

Loops are powerful tools for automating repetitive tasks. PowerShell offers various loop constructs, including for, foreach, and while.

Here’s a basic example using a for loop:

PowerShell

for ($i = 1; $i -le 5; $i++) {
  Write-Host "Loop iteration: $($i)"
}

This loop iterates five times, displaying the current iteration number each time.

Introduction to Powershell

PowerShell: A Beginner’s Guide

PowerShell is a powerful tool for system administrators and automation enthusiasts. But for newcomers, it can seem intimidating. This blog post will be your one-stop guide to understanding PowerShell, its history, versions, and the key differences between Windows PowerShell and PowerShell Core.

A Brief History of PowerShell

Microsoft introduced PowerShell in 2006. Its aim was to provide a more robust and flexible alternative to traditional command prompts like CMD. Built on the .NET Framework, PowerShell offered a unique object-oriented approach to system administration tasks. This allowed for greater automation and manipulation of complex data structures.

Over the years, PowerShell has grown significantly. It’s become a cornerstone of Microsoft’s automation strategy, with active development and a thriving community.

Navigate through PowerShell Versions

As PowerShell has evolved, so have its versions. Here’s a quick rundown of the most notable ones:

  • Windows PowerShell (v1.0 – v5.1): This is the original version that shipped with Windows operating systems. It’s tightly integrated with the .NET Framework and primarily targets Windows environments.
  • PowerShell Core (v6.0 and later): This is a cross-platform version of PowerShell that runs on Windows, macOS, and Linux. It’s built on the .NET Core framework, making it more lightweight and portable.
  • PowerShell 7: The latest major release, PowerShell 7 is based on PowerShell Core and offers several improvements, including enhanced performance and security.

Windows PowerShell vs. PowerShell Core: Understanding the Differences

While both Windows PowerShell and PowerShell Core share the same core functionality, there are some key differences to consider:

  • Platform: Windows PowerShell is specific to Windows environments, while PowerShell Core is cross-platform.
  • Underlying Framework: Windows PowerShell relies on the .NET Framework, whereas PowerShell Core leverages the .NET Core framework.
  • Integration with Windows Features: Windows PowerShell offers deeper integration with certain Windows features, like Active Directory.
  • Availability of Cmdlets: Some cmdlets might be exclusive to Windows PowerShell due to their dependence on Windows-specific functionalities.

Choosing the Right Version:

The choice between Windows PowerShell and PowerShell Core depends on your specific needs. If you’re primarily working on Windows machines and require tight integration with Windows features, Windows PowerShell might be the better option. However, if you need a cross-platform solution or prefer a more lightweight and future-proof option, PowerShell Core is the way to go.

Getting Started with PowerShell

Ready to dive into the world of PowerShell? Here are some resources to get you started:

×