A Deep Dive into Azure Stack HCI Storage QoS
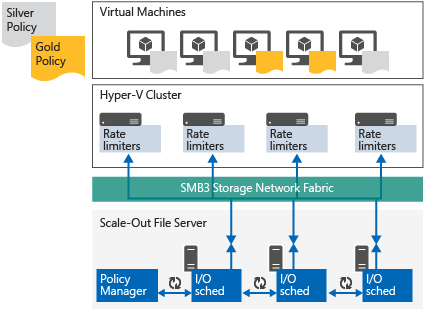
Azure Stack HCI offers a compelling hyperconverged infrastructure solution, but keeping all your virtual machines (VMs) in perfect harmony requires careful management of storage resources. Enter Storage Quality of Service (QoS), a powerful tool for ensuring predictable performance and prioritizing critical applications. This blog delves into the planning, implementation, and management of Storage QoS in Azure Stack HCI, empowering you to become a storage performance maestro.

Planning Your Storage QoS Strategy
Before diving into configuration, a well-defined plan is key. Here’s what to consider:
-
Application Needs: Identify your VMs’ storage I/O requirements. Mission-critical databases and real-time applications typically demand higher priority and guaranteed IOPS.
-
Workload Analysis: Analyze your VM workloads. Are there predictable spikes in I/O activity at specific times? Understanding usage patterns helps tailor QoS policies effectively.
-
Baseline Performance: Establish baseline storage performance metrics (IOPS, latency) before implementing QoS. This provides a reference point to measure the impact of your configuration.
Tools of the Trade: Implementing Storage QoS
While Azure Stack HCI lacks a native GUI for QoS, PowerShell commands offer granular control. Here’s your toolkit:
-
New-StorageQoSPolicy: This cmdlet creates a new QoS policy, specifying a descriptive name and optionally a description for clarity.
-
Add-StorageQoSPolicyAssociation: This command associates the newly created policy with specific VMs or VM groups. You can target VMs by name, IP address, or other identifiers.
-
Set-StorageQoSPolicy: This cmdlet allows you to configure the policy itself. Here’s where the magic happens:
-
Minimum IOPS: Set the guaranteed minimum IOPS for VMs assigned to the policy. This ensures they receive a baseline level of performance.
-
Maximum IOPS: Define the maximum IOPS limit to prevent any single VM from consuming excessive bandwidth and impacting others.
Real-World Example: Prioritizing Database Performance
Let’s say you have a VM running a critical business database. You want to ensure it receives consistent performance, even during peak usage periods. Here’s how to implement QoS:
-
Create a Policy: Use New-StorageQoSPolicy to create a policy named “Database_Priority”.
-
Associate the Policy: Run Add-StorageQoSPolicyAssociation -PolicyName Database_Priority -VMName DatabaseVM to associate the policy with the “DatabaseVM”.
-
Configure the Policy: Use Set-StorageQoSPolicy -PolicyName Database_Priority -MinIops 1000 -MaxIops 2000 to set a minimum guaranteed IOPS of 1000 and a maximum limit of 2000 for the database VM.
Beyond PowerShell: Monitoring and Optimization
PowerShell provides the foundation, but a complete QoS solution requires ongoing monitoring and adjustment. Here are some additional tools:
-
System Center Virtual Machine Manager (VMM): While VMM doesn’t directly configure QoS in Azure Stack HCI (yet!), it offers valuable storage performance monitoring capabilities.
-
Azure Monitor: Leverage Azure Monitor for in-depth insights into storage performance metrics like IOPS and latency. Set up alerts to notify you of potential bottlenecks.
Fine-Tuning Your Storage Orchestra:
Remember, QoS is an ongoing process. Regularly monitor performance metrics and adjust your QoS policies as needed. Here are some best practices:
-
Start Conservative: Begin with moderate IOPS limits and gradually adjust based on observed performance.
-
Monitor and Refine: Continuously monitor storage performance and refine your policies to optimize resource allocation.
-
Test Changes: Implement changes in a controlled environment before deploying them to production.
Conclusion: Conduct Your Own Performance Symphony
By implementing Storage QoS with careful planning and the right tools, you can ensure your Azure Stack HCI environment functions like a well-conducted orchestra. Prioritize critical applications, manage resource allocation, and monitor for optimal performance. With a little practice, you’ll be a storage performance maestro in no time!

